Barnett Clutch Installation
|
Joined: Jan 2005
Posts: 694
Adjunct
|
OP

Adjunct
Joined: Jan 2005
Posts: 694 |
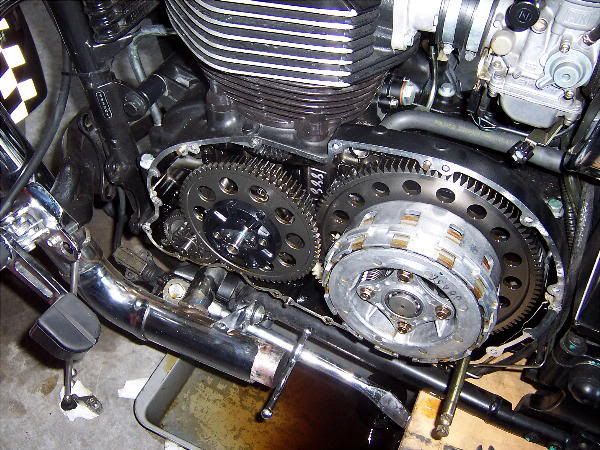
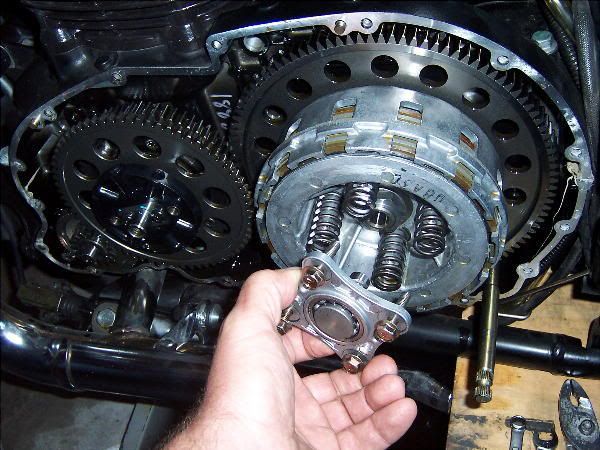
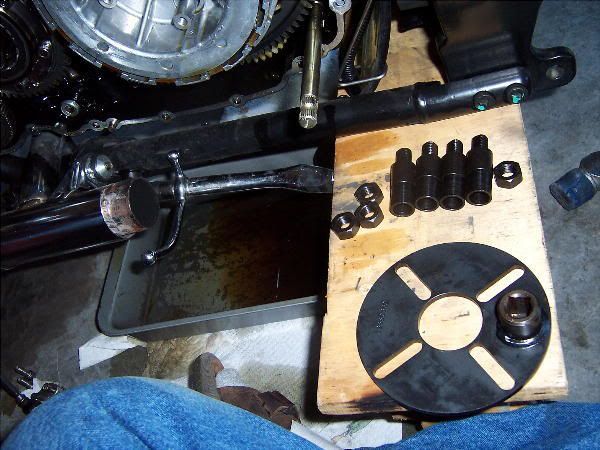
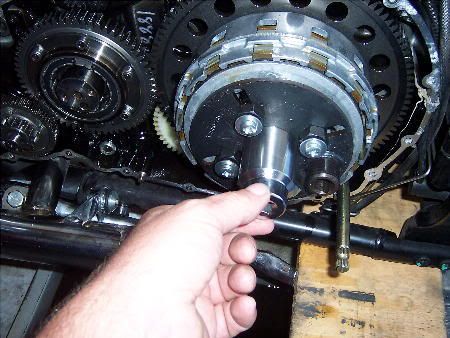
Okay, thought I'd start this thread because today I initiated my Barnett Heavy-Duty clutch installation. I'll post pictures along the way for BA.com members' illumination. This is a picture of the removing of the clutch cover after following the service manuel exactly.  The next picture is what the inside of the clutch cavity looks like.  Next is a picture of removing the clutch springs (which will be replaced with stiffer ones).  That is all I did today. Tomorrow I'll use the special tool to removal all the friction plates (tool pictured below).  More to come. -BT
"Speedmaster" is a title not a name, - and the title is not plural.
|
|
|
Re: Barnett Clutch Installation
|
Joined: Jan 2005
Posts: 6,308 Likes: 4
Worn Saddle
|
|
Worn Saddle
Joined: Jan 2005
Posts: 6,308 Likes: 4 |
By looking at the last picture I see you have the same center pushrod thing-a-ma-bob I had. you WILL NOT need the other special tool to realign it. Just use the tool pictured with the four posts and your two big wrenches and beef it right off.
The clutch assembly will self align when you reinstall it as long as you tighten the four bolts that go in the spring holes evenly and criss cross. You'll know if it's centered if you can remove and replace the center pushrod easily..
The older model clutches needed the tool because the center rod was a lot smaller in the axles and there was the chance it would not center and end up slightly crooked, which would cause a lot of clutch chatter when disengaging due to the center rod rubbing the axle at an angle. That make any sense?
A word to the wise is not necessary. It is the stupid ones who need the advice.
Pat
|
|
|
Re: Barnett Clutch Installation
|
Joined: Jan 2005
Posts: 694
Adjunct
|
|
OP
Adjunct
Joined: Jan 2005
Posts: 694 |
Dinqua,
Yeah, that makes sense. As long as that center push rod is unobstucted, & can be pull out / put in by hand, the plates should be centered. I have bought the aligning tool also. So it not like I'm not prepared to use it, if necessary.
What happened last night was the outside diameter of my 30mm socket was too large to fit through the removal tool (sheesh!), so I'm going to make a Sunday afternoon visit to my place of work and turn it down a little on our metal lathe (going slow over the tool-steel), and then I'll be back in business.
-BT
"Speedmaster" is a title not a name, - and the title is not plural.
|
|
|
Re: Barnett Clutch Installation
|
Joined: Jan 2005
Posts: 1,320
Learned Hand
|
|
Learned Hand
Joined: Jan 2005
Posts: 1,320 |
Keep the pics coming! Good stuff to watch :-)
Michael D. Rodriguez
|
|
|
Re: Barnett Clutch Installation
|
Joined: Jan 2005
Posts: 694
Adjunct
|
|
OP
Adjunct
Joined: Jan 2005
Posts: 694 |
Dinqua, Well, my 30mm socket that had a outside diameter that was to large has been turned on the metal lathe (what a freakin hassle). Anyway, now it fits (see pic below).  (reduced the circumference almost .080)  (as you can see, now the socket fits through) _BT
"Speedmaster" is a title not a name, - and the title is not plural.
|
|
|
Re: Barnett Clutch Installation
|
Joined: Jan 2005
Posts: 694
Adjunct
|
|
OP
Adjunct
Joined: Jan 2005
Posts: 694 |
Okay, this clutch installation takes careful attention to the service manual. If any of you all decide to take this on, pay careful attention to every step. And read ahead so that you have an idea of what's coming up. Anyway, I'll just lightly touch on this little clutch task with pictures and descriptions of the same. Here goes,  (This picture is a side by side comparison of the stock clutch springs & the new Barnett springs)  (You must install the service tool, then put the 30mm socket through it)  (As you can see, the whole clutch plate assembly can be loosened by using the service tool with two breaker-bars prying against each other)  (After prying with the two breaker-bars, gently remove the whole clutch plate basket, - service tool and all)  (Then take it over to your workbench to take out the old, and install the new, - clutch plates) I tired (I get up at 3:30am). I'll post more pictures tomorrow that shows the installation & assembly. -BT
"Speedmaster" is a title not a name, - and the title is not plural.
|
|
|
Re: Barnett Clutch Installation
|
Joined: Jan 2005
Posts: 503
Adjunct
|
|
Adjunct
Joined: Jan 2005
Posts: 503 |
No wonder you couldn't ride today (you missed a good one up Hwy 410). You're too busy playing master mechanic. Steve
|
|
|
Re: Barnett Clutch Installation
|
Joined: Jan 2005
Posts: 999
3/4 Throttle
|
|
3/4 Throttle
Joined: Jan 2005
Posts: 999 |
and carpenter!! i see a speaker i think. what was the musical influence to all this i wonder? excellent play by play. btw.
|
|
|
Re: Barnett Clutch Installation
|
Joined: Jan 2005
Posts: 694
Adjunct
|
|
OP
Adjunct
Joined: Jan 2005
Posts: 694 |
Jethro666, Let me see, the music I played was everything from Andres Segovia to Loretta Lynn to Boney James to Roy Rogers & Dale Evans (Happy Trails). See the pic below for the brew I was drinkin.  -BT
"Speedmaster" is a title not a name, - and the title is not plural.
|
|
|
Re: Barnett Clutch Installation
|
Joined: Jan 2005
Posts: 694
Adjunct
|
|
OP
Adjunct
Joined: Jan 2005
Posts: 694 |
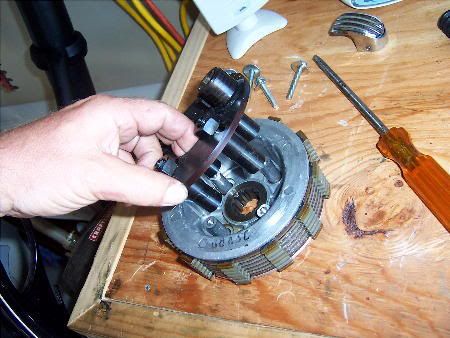
The saga continued.  (After removing the service tool, flip the whole clutch basket over & pull off the retainer)  (After pulling out all the old stock friction & metal plates, this is what you have left)  (The new plates should soak in motor oil over night before installation)  (By simply following the specific order outlined in the service manual, all the new friction and metal plates just go back together, then the retainer, then install the service tool. Then take the whole basket, - service tool installed just finger tight, and simply slide it back in. If a plate catches a bit, simply manipulate it a bit until all plates drop completely in. Always keep the service manual close by) (Torque the big clutch bolt back to 105 nm, or about 92 foot pounds.)  (Before installing the throw-out bearing mechanism, put your new stiffer springs on.)  (This final part is important. Note the part in my fingers. That is a little pushing shaft with a button-like surface. When you pull your clutch lever, a "release mechanism" pushes against that button-like surface and thus activates the throw-out bearing, thereby disengaging the clutch. It is very important that the shaft you see in my fingers can be pulled out and put back in with total ease. This verifies the the throw-out bearing is aligned perfectly. If you need the special alignment tool, then get it. But, if you have the same kind of shaft as I do, in my fingers, then you shouldn't need that tool. Just tighten down the four throw-out bearing bolts evenly and progressively. But, in the end, that shaft should slide in & out like butter.) Final thoughts to come, -BT
"Speedmaster" is a title not a name, - and the title is not plural.
|
|
|
Re: Barnett Clutch Installation
|
Joined: Jan 2005
Posts: 3,960
Loquacious
|
|
Loquacious
Joined: Jan 2005
Posts: 3,960 |
Fantastic, pictures are worth a thousand words. Thanks BT.
John
Like a dog on a car ride with my tongue in the wind
|
|
|
Re: Barnett Clutch Installation
|
Joined: Jan 2005
Posts: 11,126 Likes: 13
Should be Riding
|
|
Should be Riding
Joined: Jan 2005
Posts: 11,126 Likes: 13 |
Thanks! Bookmark created, "Bonneville America Forums: Barnett Clutch Installation" for future reference! I have downloaded all the pics you posted. I wouldn’t mind if you e-mailed me the full resolution pics too! It was real hard on me eyes to read Henry Weinhard’s wheat beer label! Could this turned 30mm socket take on a traveling nature, much like the hole saw? What are we supposed to use if we don't have access to a metal lathe? A while back dinqua was asking about the size of the clutch basket’s nut. Hey Pat, it’s 30 mm and requires a thin wall socket! Oops, It’s  for another brew! PS: Are Miller beer and Barnett Clutches compatible?
Blowing gravel off rural roads
|
|
|
Re: Barnett Clutch Installation
|
Joined: Jan 2005
Posts: 694
Adjunct
|
|
OP
Adjunct
Joined: Jan 2005
Posts: 694 |
Moe,
In my life, I've known 5 guys named "Moe." You're the 6th (unless we've met before?). 
I'm going to add a few technical & important items to remember (like how the out friction plates are different than the inner ones and must be marked out). But I first want to take my Speedy for a 50 mile cruise so that I am confident I know what the heck I'm talkin about. That'll happen tomorrow evening.
-BT
"Speedmaster" is a title not a name, - and the title is not plural.
|
|
|
Re: Barnett Clutch Installation
|
Joined: Jan 2005
Posts: 694
Adjunct
|
|
OP
Adjunct
Joined: Jan 2005
Posts: 694 |
Okay, here are a few tech-tips.  (Look at the new Barnett friction plates. See the plate that the arrow points toward? Note that the friction material is a little bit darker in color than the others. That is because that is one of the two outside friction plates. You MUST put these outside plates where they belong. Also, the Service Manual designates the outside stock metal plates as specialized from the rest, - but this is not true with the new Barnett metal plates.)  (Take a careful note of this washer that is in my fingers. The service manual warns about how this washer falls off when removing the side cover, - and mine did. You MUST put it back after it falls off, and make sure it's where it belongs when you reinstall the side cover.)  (Among other recommended inspection & lube points in the Service Manual, note the arrows, - you are to check that O-ring for wear and replace if necessary. Then lube before reassembly. The same is true for the other seal that the 2nd arrow points toward.) These are only three tips. There is much more in the Service Manual that any "common-sense mechanic" would utilize while this job is opened up. By the way, I rode my Speedy around the block and the new clutch worked flawlessly. I have it engaging toward the bottom of the lever-pull (engaging about a third the way up). I'll know more tomorrow with a fifty mile cruise. Stay tuned. -BT
"Speedmaster" is a title not a name, - and the title is not plural.
|
|
|
Re: Barnett Clutch Installation
|
Joined: Jan 2005
Posts: 11,126 Likes: 13
Should be Riding
|
|
Should be Riding
Joined: Jan 2005
Posts: 11,126 Likes: 13 |
Thanks for posting your comments,tips and pics! Only the sixth moe? Dang. Ya oughta road test that new clutch with a side trip to Canandaigua this September! Your second picture down, re the wave washer, Ryan (ryan7771) had a bear of time re-installing it as the idler gear shaft has a tendency to fall out, roll and hide under garage floor refuse upon LH cover removal. 
Blowing gravel off rural roads
|
|
|
Re: Barnett Clutch Installation
|
Joined: Jan 2005
Posts: 694
Adjunct
|
|
OP
Adjunct
Joined: Jan 2005
Posts: 694 |
The Final Analysis
I rode just under 60 miles this evening with the new clutch. I was very pleased. It worked perfectly. It was quite evident that the motorcycle had a much more beefy transfer of energy to the back wheel (which is what a clutch does). I have the 19-tooth primary sprocket. As a result, I have tall gears. The Barnett High-Performance Clutch is a real help in that situation. Also, it seems to me, if one were to acquire that Weisco Big-Bore kit (which I want to do later) this clutch kit would be a "must."
Although I don't believe in "luck," - I'm almost persuaded to start because my Speedy is running absolutely beautifully, and I am really not that good of a mechanic.
So, my verdict is that the Barnett Clutch kit is very much a worthwhile upgrade.
-BT
"Speedmaster" is a title not a name, - and the title is not plural.
|
|
|
Re: Barnett Clutch Installation
|
Joined: Jan 2005
Posts: 2,968 Likes: 1
Loquacious
|
|
Loquacious
Joined: Jan 2005
Posts: 2,968 Likes: 1 |
Awesome pictures and write-up Biker!! thanks for all the effort and details. This is great stuff.
Last edited by fishercat; 07/21/2005 3:19 PM.
|
|
|
Re: Barnett Clutch Installation
|
Joined: Jan 2005
Posts: 1,320
Learned Hand
|
|
Learned Hand
Joined: Jan 2005
Posts: 1,320 |
BikerThug, curiosity question for you, if you don't mind, did you do your clutch change-out because your bike needed it, or did you just get the itch?? My Speedmaster has almost 13000 miles on the clock, and I'm probably just as abusive as anyone else, and I've yet to have problems, the friction point is still right at about half-way through the lever travel. Just curious, second Fishercat's sentiments, great pictures and write-up!
Michael D. Rodriguez
|
|
|
Re: Barnett Clutch Installation
|
Joined: Jan 2005
Posts: 694
Adjunct
|
|
OP
Adjunct
Joined: Jan 2005
Posts: 694 |
RoundSlide, Here's the reason I changed the clutch. I bought the Barnett clutch kit from bellacorse.com almost a year and a half ago. I bought the kit because I was so astonished at the performance difference after installing "The Freak" full kit and rejetting. But, I never got around to installing it. Then I got the 19-tooth primary sprocket, which made me think I would really need the new clutch. But still, I didn't get around to it. Then, I recently made a commitment to taking on the Wiesco Big-Bore kit this coming Winter. After making a commitment to that I figured I better get this dang clutch installed. Anyway, The old stock friction plates really weren't that bad (see picture of them below), and the stiffer spings probably would've been all I needed. But, I figure, the more I know about fixing this thing, the less I have to depend on strangers to fix my motorcycle (which is often viewed as just the next motorcycle in their days cue). And, the stock clutch just felt softer than the new one. Anyway, take a look at the old plates below.  -BT
"Speedmaster" is a title not a name, - and the title is not plural.
|
|
|
Re: Barnett Clutch Installation
|
Joined: Jan 2005
Posts: 3,960
Loquacious
|
|
Loquacious
Joined: Jan 2005
Posts: 3,960 |
Great write up BT. Moe is right, you should really give that clutch a good break in by joining us up at Pat's for the rally. It could be the last big hurrah before you start on the big bore.
John
Like a dog on a car ride with my tongue in the wind
|
|
|
Re: Barnett Clutch Installation
|
Joined: Jan 2005
Posts: 694
Adjunct
|
|
OP
Adjunct
Joined: Jan 2005
Posts: 694 |
Here are a couple more tidbits of information.  (This is, of course, obvious, - but this pictured washer above goes behind the 30mm clutch-basket nut, and the side stamped "OUT" faces outward. I know, I know, - duh ralph!)  (This is the official Triumph clutch alignment tool for our Bonnevilles. Take note of the inserted functional descriptions of each part. I've determined I don't need the tool. However, if any of you would like to take it off my hands, I'm sure we can work something out.) -BT
"Speedmaster" is a title not a name, - and the title is not plural.
|
|
|
Re: Barnett Clutch Installation
|
Joined: Jan 2005
Posts: 12,877
Should be Riding
|
|
Should be Riding
Joined: Jan 2005
Posts: 12,877 |
Good to know someone has the tool so maybe if anyone else needs it we can sorta pass it around for a small fee  Contemplating the whole thing now with 16K on the bike...
Benny
Black & Silver '02
Too many mods to list
Not enough miles ridden
|
|
|
 Re: Barnett Clutch Installation
|
Joined: Jan 2005
Posts: 294
Adjunct
|
|
Adjunct
Joined: Jan 2005
Posts: 294 |
Great job on the pics!! Sure explained a lot to me. Any chance you are going to get rid of the installation tools? If so let me know via email. Maybe we can work something out. Thanks 
|
|
|
Re: Barnett Clutch Installation
|
Joined: Jan 2005
Posts: 5,271 Likes: 17
Saddle Sore
|
|
Saddle Sore
Joined: Jan 2005
Posts: 5,271 Likes: 17 |
Bikerthug, can we work something out on the alignment tool and the 30mm you turned down?
I'm ready to replace my stocker. Is there and difference between the kit from Bellacorse and Newbonneville.
Mike
|
|
|
Re: Barnett Clutch Installation
|
Joined: Jan 2005
Posts: 530
Adjunct
|
|
Adjunct
Joined: Jan 2005
Posts: 530 |
BT,
Do you still have those clutch installation pics? If you do, I could sure use them.
Thanks
Paul
|
|
|
Re: Barnett Clutch Installation
|
Joined: Jan 2005
Posts: 438
Adjunct
|
|
Adjunct
Joined: Jan 2005
Posts: 438 |
Beanache - I'm with you. I'm getting ready to do this mod myself, and almost all of the pictures here are gone now!
Bikerthug - What happened to them? Any chance of re-posting them?
Not you fat Jesus!
|
|
|
Re: Barnett Clutch Installation
|
Joined: Jan 2005
Posts: 530
Adjunct
|
|
Adjunct
Joined: Jan 2005
Posts: 530 |
There is not enough space to save them and the pics of his other mods are sweet. He may have a disc. later
Paul
|
|
|
Re: Barnett Clutch Installation
|
Joined: Jan 2005
Posts: 323
Adjunct
|
|
Adjunct
Joined: Jan 2005
Posts: 323 |
Am I the only one who is not getting all the pics? Of the 4 pics in the first post I only get one, the others are square boxes with a red X in them. As for the rest of the posts I'm getting one now and then but mostly red x's.
Do you think it's my settings or what?
ModelMaker
Your not the boss of me!!
|
|
|
Re: Barnett Clutch Installation
|
Joined: Jan 2005
Posts: 9,223
Big Bore
|
|
Big Bore
Joined: Jan 2005
Posts: 9,223 |
Naw, BT pulled the pics...
"Never underestimate the power of human stupidity" - Robert Heinlein
|
|
|
Re: Barnett Clutch Installation
|
Joined: Jan 2005
Posts: 694
Adjunct
|
|
OP
Adjunct
Joined: Jan 2005
Posts: 694 |
Okay everyone, - because of Sir Phil's persuasive lobbying, - all the pictures are back up.
Now go bloody your knuckles.
-BT
"Speedmaster" is a title not a name, - and the title is not plural.
|
|
|
Re: Barnett Clutch Installation
|
Joined: Jan 2005
Posts: 9,223
Big Bore
|
|
Big Bore
Joined: Jan 2005
Posts: 9,223 |
Thanks BT.... OK, maybe you DON'T look like Tim Robbins!
"Never underestimate the power of human stupidity" - Robert Heinlein
|
|
|
Re: Barnett Clutch Installation
|
Joined: Jan 2005
Posts: 323
Adjunct
|
|
Adjunct
Joined: Jan 2005
Posts: 323 |
Much better with all the pics. I've wanted to do that for no special reason for some time now. Perhaps I will now.
Thanks,
ModelMaker
Your not the boss of me!!
|
|
|
Re: Barnett Clutch Installation
|
Joined: Jan 2005
Posts: 530
Adjunct
|
|
Adjunct
Joined: Jan 2005
Posts: 530 |
|
|
|
Re: Barnett Clutch Installation
|
Joined: Feb 2006
Posts: 15
Complete Newb
|
|
Complete Newb
Joined: Feb 2006
Posts: 15 |
Excellent-much needed info . Thanks !!
eat dessert first
|
|
|
Re: Barnett Clutch Installation
|
Joined: Jul 2006
Posts: 948
3/4 Throttle
|
|
3/4 Throttle
Joined: Jul 2006
Posts: 948 |
Wow, what a great job and thanks. This site continues to amaze me with the quality of the contibutions and the willingness to share and help each other. I've never seen another inet site of any kind that has this high quality participation.
Redbike7
2006 America
No amount of skill can overcome gross stupidity. Ask me how I know...never mind, I forgot...
|
|
|
Re: Barnett Clutch Installation
|
Joined: Dec 2006
Posts: 2,150
Oil Expert
|
|
Oil Expert
Joined: Dec 2006
Posts: 2,150 |
thanks redbike, you've said it all for me.
Staintune Pipes, K&N Pods, 45 pilots, TBS needles and 145 mains.
|
|
|
Re: Barnett Clutch Installation
|
Joined: Sep 2006
Posts: 1,457
Learned Hand
|
|
Learned Hand
Joined: Sep 2006
Posts: 1,457 |
Thanks for the pics, BT. They were a big help when I changed my springs (somehow I installed throwout plate backwards). If changing the plates without the Triumph tool, how do you keep things from turning without tearing something up?
|
|
|
Re: Barnett Clutch Installation
|
Joined: Jan 2005
Posts: 11,126 Likes: 13
Should be Riding
|
|
Should be Riding
Joined: Jan 2005
Posts: 11,126 Likes: 13 |
|
|
|
Re: Barnett Clutch Installation
|
Joined: Jan 2005
Posts: 11,126 Likes: 13
Should be Riding
|
|
Should be Riding
Joined: Jan 2005
Posts: 11,126 Likes: 13 |
Quote:
Dinqua,
Well, my 30mm socket that had a outside diameter that was to large has been turned on the metal lathe (what a freakin hassle). Anyway, now it fits (see pic below).
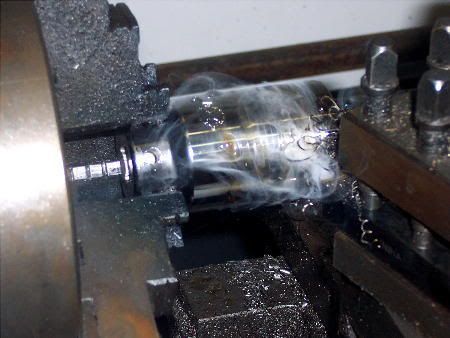
(reduced the circumference almost .080)
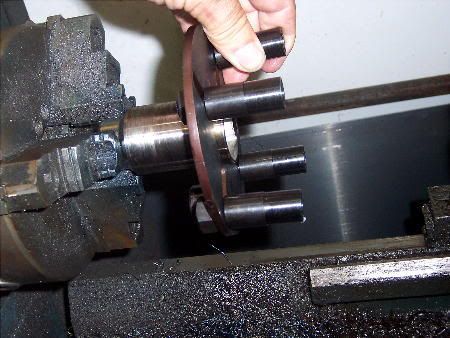
(as you can see, now the socket fits through)
_BT
|
|
|
Re: Barnett Clutch Installation
|
Joined: Jan 2005
Posts: 11,126 Likes: 13
Should be Riding
|
|
Should be Riding
Joined: Jan 2005
Posts: 11,126 Likes: 13 |
Quote:
Okay, this clutch installation takes careful attention to the service manual. If any of you all decide to take this on, pay careful attention to every step. And read ahead so that you have an idea of what's coming up.
Anyway, I'll just lightly touch on this little clutch task with pictures and descriptions of the same. Here goes,
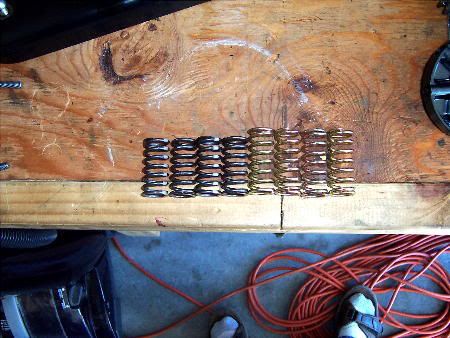
(This picture is a side by side comparison of the stock clutch springs & the new Barnett springs)
(You must install the service tool, then put the 30mm socket through it)
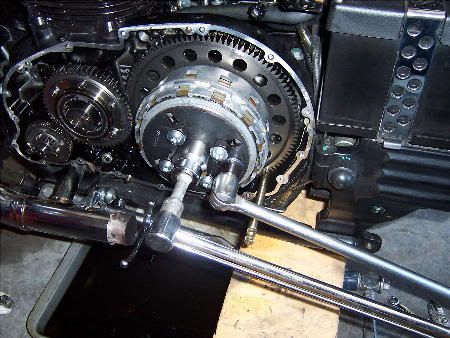
(As you can see, the whole clutch plate assembly can be loosened by using the service tool with two breaker-bars prying against each other)
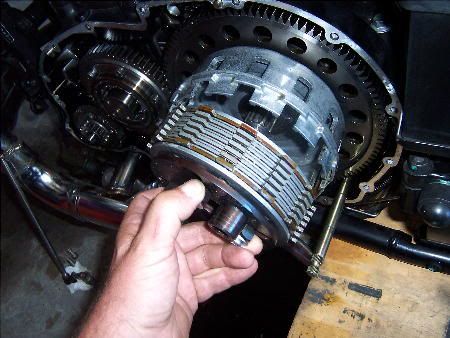
(After prying with the two breaker-bars, gently remove the whole clutch plate basket, - service tool and all)
(Then take it over to your workbench to take out the old, and install the new, - clutch plates)
I tired (I get up at 3:30am). I'll post more pictures tomorrow that shows the installation & assembly.
-BT
|
|
|
|
|