Valve adjustment / clearance check
|
Joined: Jan 2005
Posts: 530
Adjunct
|
OP

Adjunct
Joined: Jan 2005
Posts: 530 |
After combining all the info I could find from the old posts I was able to come up with a plan to check my clearance. Thanks to Moe and others. I am going to cut and past some info if anybody else wants to do it and maybe I will be able to put some pics in. If not they are in my gallery.
Moe wrote:
Think about a valve adjustment check when the valves get too loud. The original miles check was at the 8K mark but the recommendations have changed to the 12K mark. A friend has a 2001 bonneville and has never adjusted his valves. He has just over 30K on his bike too. He did check the clearances at the 25K mark and the valves clearances where fine.
So check your clearances if in doubt. Make sure the motor is at room temperature. That means a 24 hr cool down to be sure. I would recommend buying a METRIC set of feeler gauges. Pop off the pillion pad, saddle, tank console, and fuel tank. Displace the wiring harness to the left of the top tube. Remove the camshaft cover to the right of the bike. Remove the spark plugs then while the rear wheel is off the ground and the bike is in a soft gear, rotate the rear wheel as needed to check the clearances. Write the clearances down! Zip her back up and your done.
Need adjustment?
Buy a device that will measure the shim thicknesses.
Purchase in advance the sealing washers for the oil cross over tube
Purchase in advance the little o-ring for the oil cross over tube.
Consider purchasing the Pre-tensioner tool and lock ring pins.
Consider a new camshaft cover gasket.
Consider new camshaft cover washers.
Consider new spark plugs.
Consider new oil and oil filter.
Now all you have to wait for will be the shims needed should the dealer not have the size you need in stock.
Timing alignment. Do not rotate the engine once you have the camshafts aligned per the pic in the shop manual. Replace the camshafts as they are in that picture. You do not need to remove the side cover (alternator cover?) to do this job.
The shims are round coins of hardened metal. The thickness is inked on the side contacting the bucket and may wear off, thus the need for the micrometer. You will have to remove the camshafts to do observe this. Regarding removing the shims without camshaft removal. Good luck if you try! Not recommended....
You may be able to use some of your shims on other bucket locations. Careful of the pre-tensioned backlash gears. That is don’t loose the pretension. OIL EVERYTHING that needs it, LIBERALLY when reinstalling. When reinstalling the camshafts, the intake camshaft is the beech. She will not want to ’drop in’ like the exhaust one will.
Place the intake camshaft into a position that looks like one tooth off and think like a concrete vibrating tool. The camshaft will settle into place with the marks aligned. (This is when the pre-tension may discharge and why the majority of dealer jobs fail to pretension the intake’s backlash gear.)
Bolts on the bearing caps. Bring to torque then re-check the clearances. Good to go? Then ensure the cross over tube is put back with the new o-ring and brass washer(s). Torque it all down. And zip her up. You should be good for a long time.
The last time I adjusted my valves was at the 12K marks. I’m now at the 30.5 mark and everything sounds good. I am going to check them soon but like I wrote above, checking the clearances is not a big deal. Reshimming is a little more involved and the biggest issue is obtaining the shims you may need.
Work the math to determine which shim(s) you need, not to determine the nearest sizes you could use that the dealer has in stock.
Some dealers will swap out the shims you need for the ones you do not need. Should the dealer need to order the shims, they should piggy-back that small order on one of their weekly orders to Nenwnan. If they want to charge you freight, laugh and comment on what a good sense of humor they have! Keep a log of the final shims you used at each of the eight bucket locations
Intake are 0.15-0.20mm valve clearance
Exhaust are 0.25-0.30mm valve clearance
Thanks Moe. Hopefully some pics will post.


Last edited by beanache; 01/25/2005 10:00 PM.
|
|
|
Re: Valve adjustment / clearance check
|
Joined: Jan 2005
Posts: 11,126 Likes: 13
Should be Riding
|
|
Should be Riding
Joined: Jan 2005
Posts: 11,126 Likes: 13 |
Did I write all that? Dang. I don't have digital pics of that area. Undeveloped photos on an instamatic camera I do have. (I'll have them developed as at least one of those pics show the intake camshaft backlash gear in a relaxed state prior to removal.)
I'll be checking the clearances before the Dahlonega trip and the Nikon will be clicking away.
The shop manual is a must (as in it being a really big help).
The bearing caps are a bear to break loose. I was told to use a manual impact driver or an air impact wrench. I got by the first time without either. The bearing caps have torx headed bolts. I forget the size, but purchase a set of these that are of very high quality. Who was it that had to helicoil one of the bearing cap threads? Was that grump?
Shims When working out the math, use the shim size that will give you the clearance you want. That is why I say use a feeler guage calibrated primarily in metric units. The other ones have too much of a mm skip to be useful.
Shims start at a thickness of 2.000mm,
increment by 0.025mm to a
max thickness of 3.200mm.
That means we have 49 choices of shims to chose from. Don't settle for one of the 25 or so sizes your dealer may have in stock.
Good luck with the work beanache. You should not have any problems.
Blowing gravel off rural roads
|
|
|
Re: Valve adjustment / clearance check
|
Joined: Jan 2005
Posts: 8,639 Likes: 3
Old Hand
|
|
Old Hand
Joined: Jan 2005
Posts: 8,639 Likes: 3 |
Even if the marking is still visible, it is a god idea to measure the old shims as they can wear too.
Let's hope there's intelligent life somewhere in space 'cause it's buggar all down here. -- Monte Python
|
|
|
Re: Valve adjustment / clearance check
|
Joined: Jan 2005
Posts: 27
Greenhorn
|
|
Greenhorn
Joined: Jan 2005
Posts: 27 |
WOW! Thanks for the info. While I enjoy all the other stuff as well, THIS is the kind of stuff I'm looking for on this site. Thanks for all time you put into researching and documenting and for all the helpful hints and suggestions from everyone. I'm trying to learn how to wrench on my own bike and this site never ceases to amaze me. This is great!
Matt
Looking for that blessed hope, and the glorious appearing of the great God and our Saviour Jesus Christ. (Titus 2:13)
|
|
|
Re: Valve adjustment / clearance check
|
Joined: Jan 2005
Posts: 530
Adjunct
|
|
OP
Adjunct
Joined: Jan 2005
Posts: 530 |
Thanks Moe,
I have an impact wrench. I am not familiar with torx headed bolts but I guess I will soon learn. Hell, it's an opportunity to buy new tools. I guess with the shims, you have to take them out and measure them before you can reorder? I will be doing some of the work this weekend. More pictures to go in my gallery will follow. I just hope I don't screw anything up.
By the way, I talked to Big4 cycle and they told me about $9.00 a shim. That sound right to you?
|
|
|
Re: Valve adjustment / clearance check
|
Joined: Jan 2005
Posts: 11,126 Likes: 13
Should be Riding
|
|
Should be Riding
Joined: Jan 2005
Posts: 11,126 Likes: 13 |
beanache, The tork headed bolts require a torx tool. Like the one in this photo. Get the ones attached to 3/8 drive sockets because you will never get enough grunt using the handled one shown.  Here is a pic of what I mean:  Quote:
I guess with the shims, you have to take them out and measure them before you can reorder?
Yes. But remember that you may not have to take them out. If all of one camshaft's clearances check out, you won't have to pull that camshaft. Some shims may be used in other locations. Quote:
I talked to Big4 cycle and they told me about $9.00 a shim. That sound right to you?
Yeah, $7.95. A local dealer may swap out the shims for no charge. Last time I got the swap out price: Free! Only an hour to the dealer each way though!
Pull the plugs and have your bike on a stand so you can place it in third or fourth gear and use the rear wheel to rotate the engine. The cam cover is a beech. Take off to the right. I displace the main wire harness to the left of the top tube. The relays are part of the 'shift', label these relays so you don't have to guess where they go. Ensure you have the camshafts properly oriented before you (if needed) remove one or both.
Blowing gravel off rural roads
|
|
|
Re: Valve adjustment / clearance check
|
Joined: Jan 2005
Posts: 11,126 Likes: 13
Should be Riding
|
|
Should be Riding
Joined: Jan 2005
Posts: 11,126 Likes: 13 |
Camshaft bearing caps to head bolts 10Nm
NOTES: Lubricate threads with engine oil. Specific tightening sequence. Note that there are three bearing caps per camshaft. Tighten the far right cap first (right side of bike), then tighten cap on the far left, then tighten the middle cap. Do this for each camshaft.
Camshaft oil feed pipe to bearing cap bolts 8Nm
|
|
|
Re: Valve adjustment / clearance check
|
Joined: Jan 2005
Posts: 11,126 Likes: 13
Should be Riding
|
|
Should be Riding
Joined: Jan 2005
Posts: 11,126 Likes: 13 |
Greg (Bayern710) highly recommended these tools back in November 2004: PB Baumann Store
Blowing gravel off rural roads
|
|
|
Re: Valve adjustment / clearance check
|
Joined: Jan 2005
Posts: 530
Adjunct
|
|
OP
Adjunct
Joined: Jan 2005
Posts: 530 |
Moe, Just wanted to say thanks again. Here is a continuation of the ongoing valve adjustment picture log. Pictures follow: AFTER LOBES ARE IN POSITION AND MARKS LINE UP MAKE SURE TOP IS IN TOP POSITION  PLACE THE LOCKING PINS TO HOLD THE BACKLASH GEAR  REMOVE THE OIL FEEDER TUBE AND COLLECT BANGO BOLTS, WASHERS AND O RING  UNSCREW TORX BOLTS WITH T-30 TORX WRENCH 1/2 TURN AT A TIME EVENLY UNTIL TENSION IS RELEASED  LIFT CAM CAPS OUT AND COLLECT LOCATING DOWELS  ARRANGE CAM CAPS IN ORDER THEY WERE TAKEN OUT AND IN THE SAME POSITION (FORWARD OR BACKWARDS)  LIFT OUT CAMS AND ARRANGE IN ORDER (INTAKE OR EXHAUST)  LIFT OUT SHIM BUCKETS, REMOVE SHIM, REPLACE BUCKET TO IT'S LOCATION  MEASURE SHIMS TO THE NEAREST THOUSANDTH [image]http://www.bonnevilleamerica.com/photopost/data/500/119MEASURE_SHIM_TO_THE_THOUSANDS[/image] ARRANGE SHIMS IN ORDER THEY CAME OUT  COVER YOUR CYLINDER HEAD WITH THE CAM COVER AND A TOWEL. PLACE ALL YOUR NUMBERS INTO MOE'S FORMULA SHEET. CALL BIG 4 CYCLE IN THE MORNING AND ORDER YOUR SHIMS. SIT AROUND WITH YOUR THUMB UP YOUR ASSS UNTIL THEY GET TO YOUR HOUSE. THANKS AGAIN MOE
|
|
|
Re: Valve adjustment / clearance check
|
Joined: Jan 2005
Posts: 36
Greenhorn
|
|
Greenhorn
Joined: Jan 2005
Posts: 36 |
Beanache,
Thanks for the excellent post...I won't need to do this for a while, but when I need to I'll know where to look.
Don
|
|
|
Re: Valve adjustment / clearance check
|
Joined: Jan 2005
Posts: 530
Adjunct
|
|
OP
Adjunct
Joined: Jan 2005
Posts: 530 |
Quote:
Camshaft bearing caps to head bolts 10Nm
NOTES: Lubricate threads with engine oil. Specific tightening sequence. Note that there are three bearing caps per camshaft. Tighten the far right cap first (right side of bike), then tighten cap on the far left, then tighten the middle cap. Do this for each camshaft.
Camshaft oil feed pipe to bearing cap bolts 8Nm
Moe,
As I was reading through the book, I saw no mention of this tightening sequence. I was under the assumption that when I go to replace the caps that I should start them all and then tighten them down 1/2 - 1 turn at a time in an outer-outer-inner cap sequence. Could you help me out on this.
Thanks
Paul
|
|
|
Re: Valve adjustment / clearance check
|
Joined: Jan 2005
Posts: 3,954
Loquacious
|
|
Loquacious
Joined: Jan 2005
Posts: 3,954 |
beanache,
one small point. If/when you order the small o-rings for the oil crossover tube, don't replace the old ones until you are putting the new shims in, otherwise, order 2 pairs of o-rings. If you replace the o-rings while measuring the shims, then order the shims, then have to wait a week or 2 for the shims, and still ride, the o-ring material will begin to age from the heat, and might be damaged (but not enough to be noticed by the naked eye) during reassembly of the motor. Now, over a 2 week period, a very small nick might not be a big deal, but put the engine back together with a damaged o-ring and then put 12,000 miles on it with weak pressure, and it might be a different story altogether. Not trying to sound like a know-it-all, or anything, but just something for someone doing this the first time. I didn't even think about it till I did it the first time, measured my shims, and then realized that as I was getting ready to put my new o-rings on, I was going to have to disassemble them again in 2 weeks. So, I lubed up the old ones, gave them a good looking over, and put them back in until the new shims came, THEN replaced them. Just my 2 cents...
Excellent post and pics by the way. It is a VERY daunting job when jumping into it the first time, but once you've done it, it's not that bad as long as you take your time and proceed carefully.
|
|
|
Re: Valve adjustment / clearance check
|
Joined: Jan 2005
Posts: 3,954
Loquacious
|
|
Loquacious
Joined: Jan 2005
Posts: 3,954 |
Pretty sure I saw it in my manual, if so, I'll photo the page and post it.
|
|
|
Re: Valve adjustment / clearance check
|
Joined: Jan 2005
Posts: 530
Adjunct
|
|
OP
Adjunct
Joined: Jan 2005
Posts: 530 |
Greg,
My bike is down anyway. It's been down for about 3 weeks already. When I stripped the cam cover bolt hole and realized I was going to be waiting for parts to fix it, I started tearing my bike apart to do everything I have been meaning to do.
So besides the valve adjustment (waiting on shims) and the stripped bolt hole (fixed today) I am still waiting on Brent's SS brake lines with chrome fittings. I put Bellacorse SS throttle cables and clutch cables on 2 days ago. I buried the wires in my handlebars 2.5 weeks ago. I won't be doing any work on the bike for a while after I am done. That is unless I ****** everything up and have to start over.
I also bought some pretty chrome accessories from Brent and Ma's. My local Ace Hardware also got a metric chrome bolt section in their store and I've spent $200.00 for bolts and such. All in all, I've dropped over a $1000.00 on parts, tools and goodies in the last 3-4 weeks and I am sick of not riding. Why do you think I've had so much time to type long messages and post pictures and all this crap. I am bored silly. Anyway, see you in May.
Later
|
|
|
Re: Valve adjustment / clearance check
|
Joined: Jan 2005
Posts: 1,216
Learned Hand
|
|
Learned Hand
Joined: Jan 2005
Posts: 1,216 |
Man, excellent work with the detail and photos. I've intended to do photo documentation several times, but just wasn't dedicated and patient enough to follow through (not that I've ever done anything as critical as this).
Wanted to tell you you're doing a great job. Thanks for the favor.
|
|
|
Re: Valve adjustment / clearance check
|
Joined: Jan 2005
Posts: 11,126 Likes: 13
Should be Riding
|
|
Should be Riding
Joined: Jan 2005
Posts: 11,126 Likes: 13 |
Quote:
I saw no mention of this tightening sequence. I was under the assumption that when I go to replace the caps that I should start them all and then tighten them down 1/2 - 1 turn at a time in an outer-outer-inner cap sequence. Could you help me out on this.
Paul,
bonnyusa (Phil) has in his Bonneville America and Speedmaster Torque Specifications Documents
First pageQuote:
Lubricate threads with engine oil. Specific tightening sequence. See Note 2 below for tightening sequence:
NOTE 2 (on the last page):

Quote:
Note that there are three bearing caps per camshaft. Tighten the far right cap first (right side of bike), then tighten cap on the far left, then tighten the middle cap. Do this for each camshaft.
This was my interpretation of the image above.
How was dropping the intake camshaft back into place?
Speaking of the oil crossover tube o-ring, the dealer that adjusted my valves, had no o-rings or brass washers in stock. Yet the o-ring's ID is 9mm and the OD is 10mm. So Ace Hardware would work. I have a list of part numbers and size specs at home for Triumph parts I have ordered. I need to post these somewhere....
When I check Vera's valve adjustments, I figure it will be about time to replace (or at least have on hand) the cam cover seal and cam cover bolt seals. Vera is still on her originals and new ones may be in order. Big4 Cycles once again. Got a new set of cush drive rubbers too.
Ride safe.
Blowing gravel off rural roads
|
|
|
Re: Valve adjustment / clearance check
|
Joined: Jan 2005
Posts: 11,126 Likes: 13
Should be Riding
|
|
Should be Riding
Joined: Jan 2005
Posts: 11,126 Likes: 13 |
Quote:
Moe,
Just wanted to say thanks again.
You're Welcome! I take it the spreadsheet worked OK? Remember, that is a beta version...
Blowing gravel off rural roads
|
|
|
Re: Valve adjustment / clearance check
|
Joined: Jan 2005
Posts: 530
Adjunct
|
|
OP
Adjunct
Joined: Jan 2005
Posts: 530 |
I do remember seeing that in the book somewhere. I will have to look again before I whip her together. The spreadsheet was awesome. thanks again.
I will tell you how it goes.
Later
|
|
|
Re: Valve adjustment / clearance check
|
Joined: Jan 2005
Posts: 922
3/4 Throttle
|
|
3/4 Throttle
Joined: Jan 2005
Posts: 922 |
The way we used to adjust valves on the first water pumper VW's (Rabbits & Dashers c.1974/5) was to use a hand held, Y shaped spring compressor to push down the bucket. Then, we plucked the shim from there with "pliars" which looked much like snap ring pliars with about a 30* bend on the long, skinny ends.
Isn't there enough room on top the twin engine head to do this? Seems like a real pain to remove the cam bearing caps!
From the pics posted above, it looks as though this method could be used on the outer valves, but maybe the inner ones are too "buried".
|
|
|
I Forgot...Can you help?
|
Joined: Jan 2005
Posts: 530
Adjunct
|
|
OP
Adjunct
Joined: Jan 2005
Posts: 530 |
Moe or Pat,
I can't remember which side goes down on the Cam cover sealing washer. I would guess it is the rubber side but I figured I would ask for some help.
Thanks
Paul
|
|
|
CAM COVER BOLT SEALING WASHERS
|
Joined: Jan 2005
Posts: 530
Adjunct
|
|
OP
Adjunct
Joined: Jan 2005
Posts: 530 |
Anyone know which way these things go. I can't remember.
metal or rubber side down??
I received the last of my parts today and I am going to put the shims in. I wasn't paying attention when I took the cam cover off and can't remember which way the sealing washers are replaced.
Thanks
Paul
|
|
|
Re: CAM COVER BOLT SEALING WASHERS
|
Joined: Jan 2005
Posts: 8,639 Likes: 3
Old Hand
|
|
Old Hand
Joined: Jan 2005
Posts: 8,639 Likes: 3 |
Don't have my manual here, but I would think rubber side down and metal toward the bolt heads. Otherwise, tightening the bolts could chew up the rubber and cause a leak.
Let's hope there's intelligent life somewhere in space 'cause it's buggar all down here. -- Monte Python
|
|
|
Re: CAM COVER BOLT SEALING WASHERS
|
Joined: Jan 2005
Posts: 530
Adjunct
|
|
OP
Adjunct
Joined: Jan 2005
Posts: 530 |
|
|
|
Re: CAM COVER BOLT SEALING WASHERS
|
Joined: Jan 2005
Posts: 11,126 Likes: 13
Should be Riding
|
|
Should be Riding
Joined: Jan 2005
Posts: 11,126 Likes: 13 |
Paul, Greybeard nailed it. I searched my post for this Quote:
The cam cover’s washers should be metal up on reassembly.
Archives
Blowing gravel off rural roads
|
|
|
Re: CAM COVER BOLT SEALING WASHERS
|
Joined: Jan 2005
Posts: 134
Adjunct
|
|
Adjunct
Joined: Jan 2005
Posts: 134 |
I don't think it makes much difference but I checked mine last night and they are rubber side up. As far as I know (I bought my BA in '03 with 1000 miles) my cam covers have never been off. FWIW, the ones on my Trophy are also fitted rubber side up.
Keith
|
|
|
Re: Valve adjustment / clearance check
|
Joined: Mar 2005
Posts: 14
Complete Newb
|
|
Complete Newb
Joined: Mar 2005
Posts: 14 |
i was told that you need a special tool to do the shims on the BA. is this true? looks like a fork. anyone??
|
|
|
Re: Valve adjustment / clearance check
|
Joined: Jan 2005
Posts: 4,074 Likes: 83
Loquacious
|
|
Loquacious
Joined: Jan 2005
Posts: 4,074 Likes: 83 |
The tools are two pins to hold the backlash gear in place and one to reload the spring for the backlash gear in case the pin comes out. The camshafts have to be removed to replace the shims.
|
|
|
Re: Valve adjustment / clearance check
|
Joined: Mar 2005
Posts: 14
Complete Newb
|
|
Complete Newb
Joined: Mar 2005
Posts: 14 |
|
|
|
REPOST OF VALVE ADJUSTMENT PICTURES
|
Joined: Jan 2005
Posts: 530
Adjunct
|
|
OP
Adjunct
Joined: Jan 2005
Posts: 530 |
PLEASE READ THE PRECEDING POSTS. ALOT OF GOOD POINTS. THESE ARE JUST THE PICTURES. MEASURE SHIMS 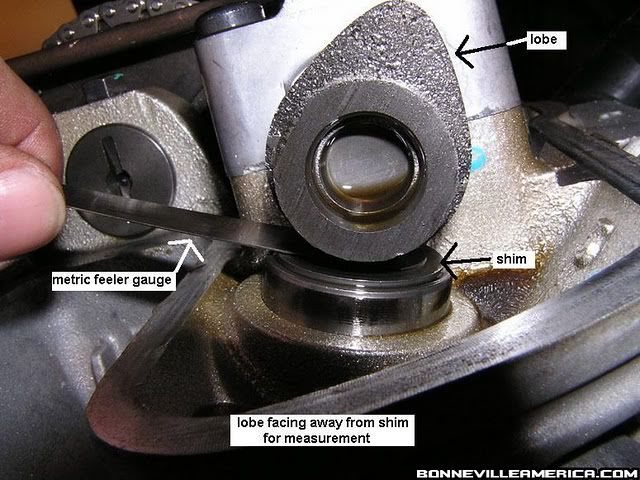 POSITION TO TOP 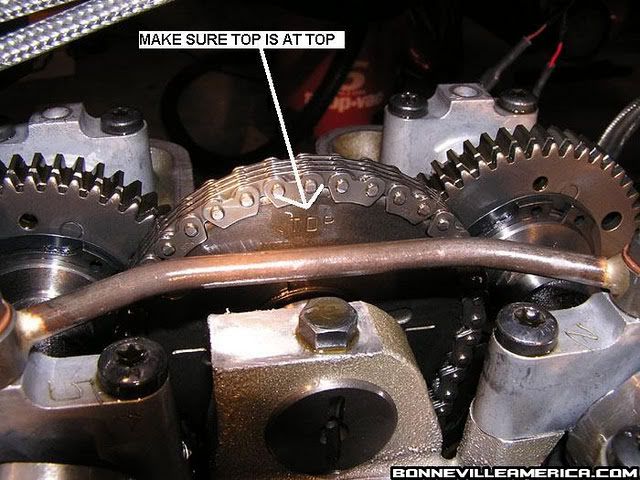 POSITION OF RIGHT LOBES 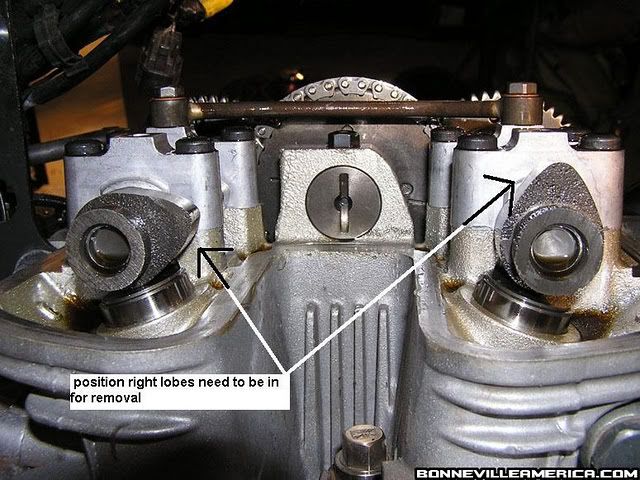 PICTURE OF RIGHT INTAKE SHIMS 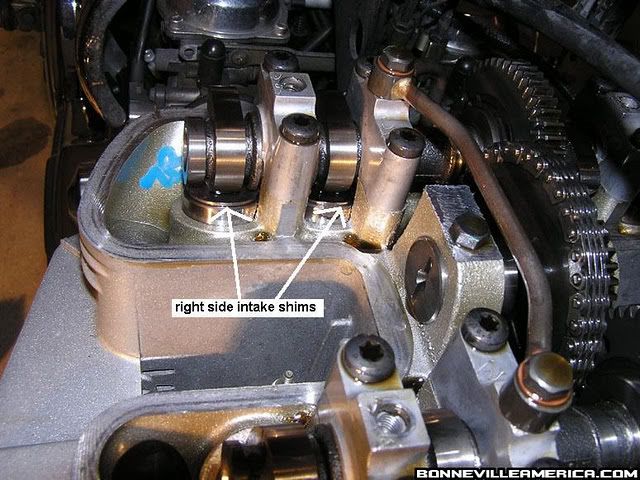 MARKS SHOULD ALIGN WITH RIGHT LOBE POSITIONING 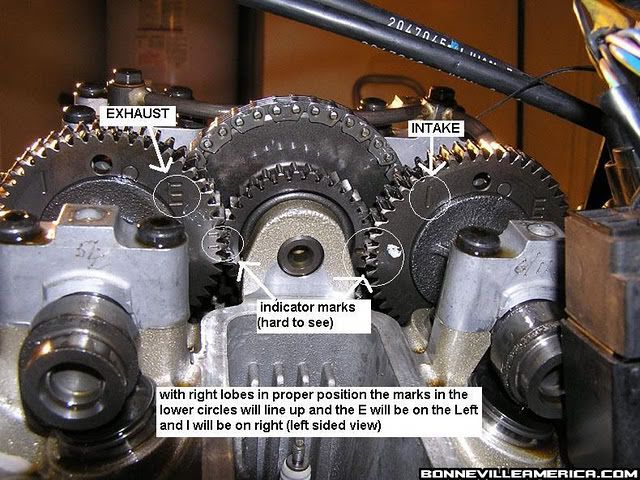 REMOVE OIL FEEDER AND BANJO BOLTS 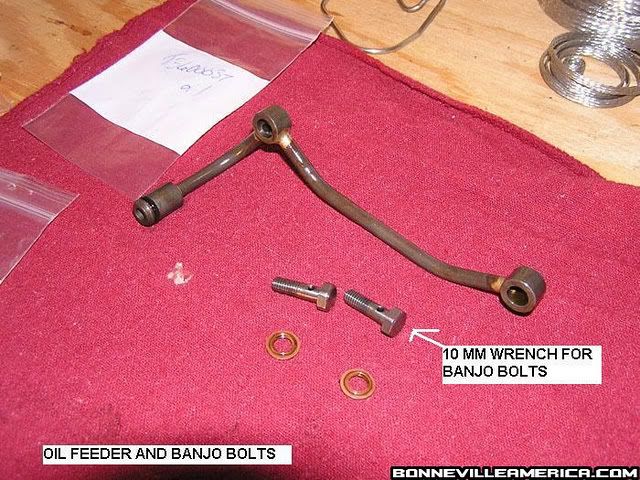 LOCK GEARS WITH LOCKING PINS 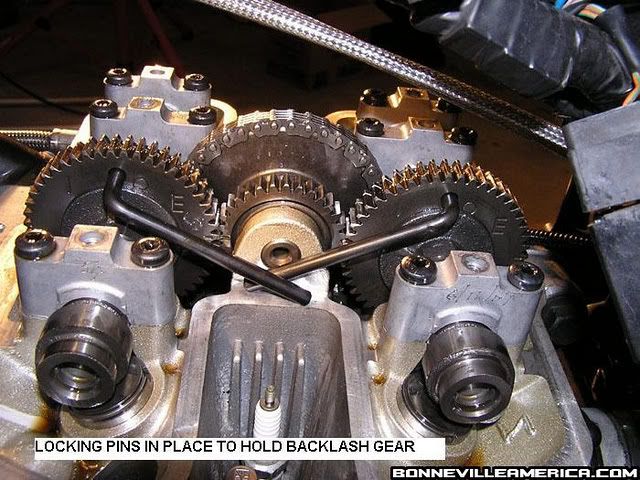 UNSCREW CAM CAPS FOR REMOVAL (BE CAREFUL!!!) 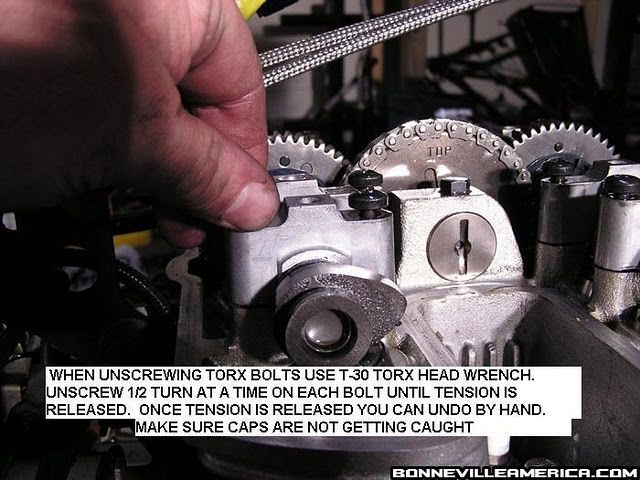 REMOVE CAM CAPS AND COLLECT LOCATING DOWELS 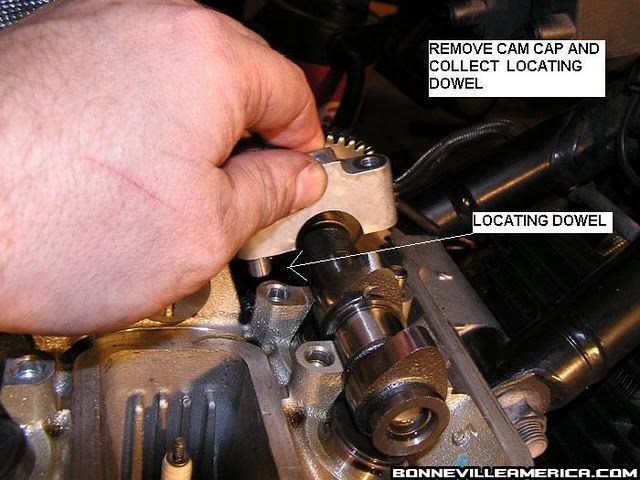 ARRANGE CAM CAPS IN ORDER  REMOVE CAMS 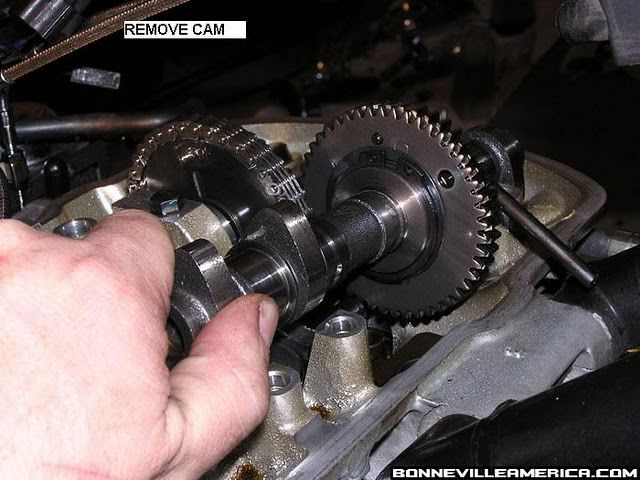 LIFT OUT BUCKET, REMOVE TARGETED SHIM, REPLACE BUCKET 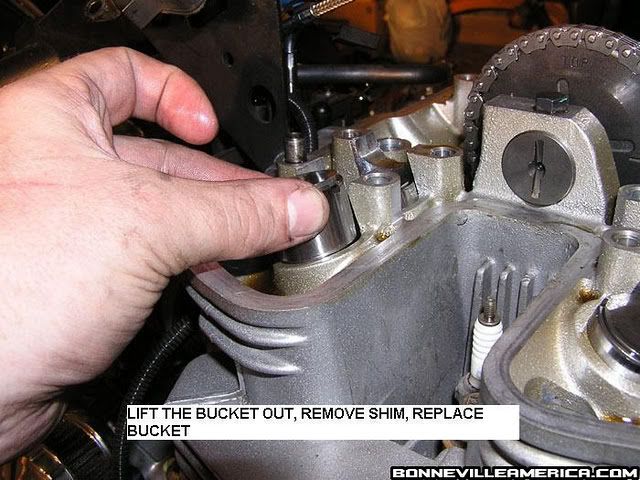 MEASURE SHIM AND DOCUMENT 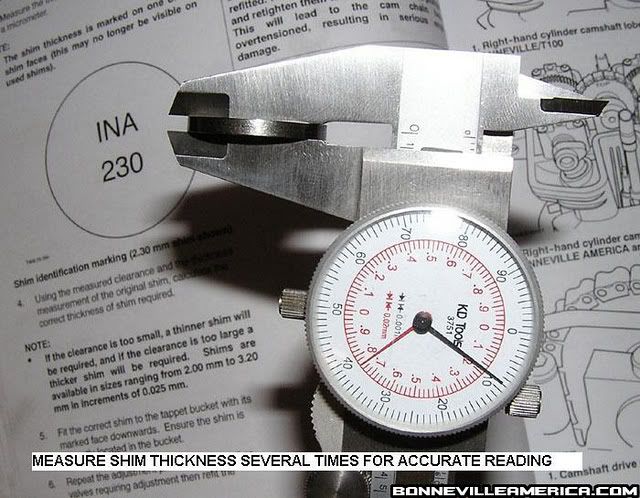 ARRANGE SHIMS IN ORDER WITH ASSOCIATED DOCUMENTATION OF LOCATION 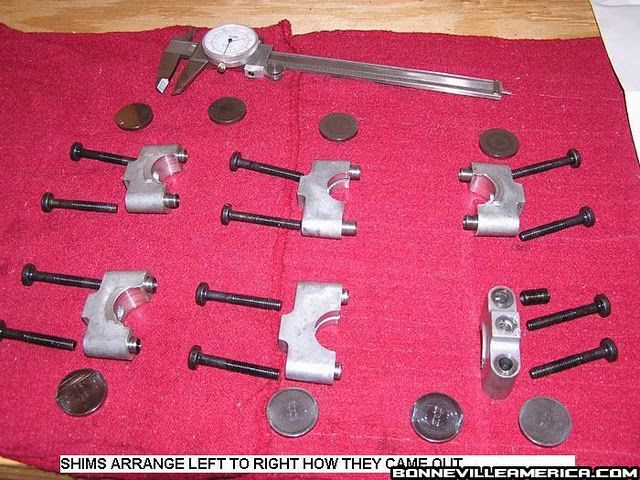 Follow the instructions from previous posts to complete the job. you will need a valve adjustment calculator. Pat has one on his site I believe. Been a while since I did this. Thanks John for making the pictures available. I thought I had lost them.
Last edited by beanache; 01/04/2012 9:13 AM.
|
|
|
Re: CAM COVER BOLT SEALING WASHERS
|
Joined: Jan 2005
Posts: 1,382
Learned Hand
|
|
Learned Hand
Joined: Jan 2005
Posts: 1,382 |
 ???????
Tony G
'03 America
|
|
|
REPOST OF VALVE ADJUSTMENT PICTURES
|
Joined: Jan 2005
Posts: 530
Adjunct
|
|
OP
Adjunct
Joined: Jan 2005
Posts: 530 |
sorry tony, had to learn how to post pictures
Last edited by beanache; 01/04/2012 9:05 AM.
|
|
|
Re: REPOST OF VALVE ADJUSTMENT PICTURES
|
Joined: Feb 2007
Posts: 23,244 Likes: 64
Fe Butt
|

Fe Butt
Joined: Feb 2007
Posts: 23,244 Likes: 64 |
Do NOT use a caliper as shown in the pictures. The shims you remove will not be flat so with a caliper you will not get the correct measurement. You should use a micrometer since they measure just the small area the shaft (spindle and anvil)makes contact with. 
I learned all I need to know about life by killing smart people and eating their brains.
Eat right ,Exercise ,Stay fit, Die Anyway!
|
|
|
Re: REPOST OF VALVE ADJUSTMENT PICTURES
|
Joined: Jan 2005
Posts: 530
Adjunct
|
|
OP
Adjunct
Joined: Jan 2005
Posts: 530 |
Agree. Use that type or digital. I used the other type because it was all I had. Had to take multiple measurements and average trying to get the "sweet spot" Thanks.
|
|
|
Re: REPOST OF VALVE ADJUSTMENT PICTURES
|
Joined: Feb 2007
Posts: 23,244 Likes: 64
Fe Butt
|
|
Fe Butt
Joined: Feb 2007
Posts: 23,244 Likes: 64 |
Laying the caps out in order is a good idea but I also mark them with a sharpie with an arrow pointing to the front of the cap and number them.
I learned all I need to know about life by killing smart people and eating their brains.
Eat right ,Exercise ,Stay fit, Die Anyway!
|
|
|
Re: REPOST OF VALVE ADJUSTMENT PICTURES
|
Joined: Jan 2005
Posts: 18,825
"Lighten up, Francis."
|
|
"Lighten up, Francis."
Joined: Jan 2005
Posts: 18,825 |
I should update the Tech Vault with these photos.
One more note: DO NOT MIX UP THE CAMSHAFTS. In fact, don't take them both out at the same time if you can help it. It takes 3 months to get replacement valves from Triumph. Ask me how I know...
|
|
|
Re: REPOST OF VALVE ADJUSTMENT PICTURES
|
Joined: Apr 2006
Posts: 8
Complete Newb
|
|
Complete Newb
Joined: Apr 2006
Posts: 8 |
Another tip that I got from someone (who?) else on the site concerning the backlash tool. Here's a great substitute: Use a flat head M4 bolt with a nut on each cam – the flat head will center the bolt in the larger hole (6mm) and the screw will fit through the 4 mm hole. Tightening the nut will hold the 2 gears together. Worked for me 
|
|
|
|
|