Light Bar installation
|
Joined: Jun 2008
Posts: 47
Greenhorn
|
OP

Greenhorn
Joined: Jun 2008
Posts: 47 |
Just got a new light bar & kit and would like to learn to install it myself vs. taking it to the shop.
Is it particularly hard to do or relatively easy? I don't have a manual as of yet, so if someone would be able to explain it in relatively simple terms (I'm a former Marine), I'd appreciate it!
One more thing: does it involve removing the gas tank?
Thanks,
Dave
'05 Green TBA
|
|
|
Re: Light Bar installation
|
Joined: Feb 2007
Posts: 23,219 Likes: 61
Fe Butt
|

Fe Butt
Joined: Feb 2007
Posts: 23,219 Likes: 61 |
Wendys is installed so that they come on with her high beam and off with low beam. I took an auto bulb and soldered a wire to the side and one to the center contact to make a simple test light. Then inside the headlight bucket I turned on the headlight on high beam and tested each wire at the plugs until I found one that was hot with high beam on and not hot when high beam was off. Went back a little from the plug and stripped off some insulation and soldered the pos. light bar wire in. You could do the same to find one hot when key is on and not when off just watch what you connect to that you don't over load a fuse. Wendys had worked great for years and 13,000 miles now.
I learned all I need to know about life by killing smart people and eating their brains.
Eat right ,Exercise ,Stay fit, Die Anyway!
|
|
|
Re: Light Bar installation
|
Joined: Jan 2005
Posts: 828
3/4 Throttle
|
|
3/4 Throttle
Joined: Jan 2005
Posts: 828 |
The standard install is very easy (after you feed the wires through the bars - that part can be a PITA). If you have the instructions then all you have to do is follow them. Basically, all you have to do is feed the wires through the bar and bolt the lights on the end of the bar, connect the bar to the lower triple tree, feed the wire along the frame to the relays underneath the tank (yes, you will have to remove the tank), and swap out one of the relays with the one provided with the kit (the instructions tell you which one). If you leave the switch in the 'on' position then they will come on when you turn the ignition switch on. I have fairly long arms so turning them on and off while on the bike isn't a big deal for me either. Adding the lights (either the Triumph bar or modded aftermarket lights) is definitely a worthwhile addition, the extra light is a big improvement over the stock headlamp.
|
|
|
Re: Light Bar installation
|
Joined: Jun 2008
Posts: 47
Greenhorn
|
|
OP
Greenhorn
Joined: Jun 2008
Posts: 47 |
Ok, I think I can forget about soldering anything - don't have the equipment and/or know-how to know what I'm doing with all that.
Secondly, the lights were purchased secondhand, so no instructions either. The light is already set up - lights are mounted and wires come through in the middle. So I assume it's just a matter of bolting the kit on the bike frame and then connecting up the wires. How hard is it to remove/reinstall the gas tank?
Be advised, I've only had this bike for about two months, and this is the first time I've ever worked on one. Thanks!
|
|
|
Re: Light Bar installation
|
Joined: Jan 2005
Posts: 5,172
Saddle Sore
|
|
Saddle Sore
Joined: Jan 2005
Posts: 5,172 |
Removing the gas tank is not hard - just takes some common sense...
1. Turn off the petcock.
2. remove the fuel line from the petcock - have a rag under it to catch the small amount of gas that will spill from the line. I put a golf tee in the line to plug it - but that's me.
3. Remove the seat.
4. Remove the 3 allen head bolts from the chrome console. Unplug the harness and remove the console.
5. Remove the bolt from the rear of the tank.
6. Lift the tank slightly and slide it back slightly. Reach under the center of the tank and you will find a vent hose on a small curved pipe. Pull the vent hose off and let it drop. The hose, not the tank. Raise and pull the tank back until it comes free of the guides - one on each side of the frame "spine". At this point, look under the tank and note the curved metal pieces that engage the guides....
7. Remove the tank and set it aside - preferably on something soft and in such a manner so it's not resting on the petcock. There's a joke here somewhere, but enough about that....
Do your thing with the lightbar wiring, then reinstall the tank in the reverse order of the above. I always wanted to say that...
Be sure to get those curved metal guides under the tank to slide over the guideposts on the frame with the rubber cushions when you reinstall the tank. If you miss, the next time your handlebars flop over left or right, there will be dents.
Don't ask how I know.
More flags
More fun!
|
|
|
Re: Light Bar installation
|
Joined: Aug 2006
Posts: 2,555
Loquacious
|
|
Loquacious
Joined: Aug 2006
Posts: 2,555 |
its realy not that difficult..getting the wires through the
bar is the hardest part.just take your time. good idea to drain your gas tank before you take it off.
The percentage you're paying is too high-priced
While you're living beyond all your means
And the man in the suit has just bought a new car
From the profit he's made on your dreams
|
|
|
Re: Light Bar installation
|
Joined: Jan 2005
Posts: 5,172
Saddle Sore
|
|
Saddle Sore
Joined: Jan 2005
Posts: 5,172 |
The bar is already assembled. As to draining the tank, I prefer to just remove it as is. The sound of that gas sloshing around in there reminds me to be careful - and to extinguish all smoking materials... 
More flags
More fun!
|
|
|
Re: Light Bar installation
|
Joined: Jun 2006
Posts: 312
Adjunct
|
|
Adjunct
Joined: Jun 2006
Posts: 312 |
Is there a plug on the end of the wires, if so there is a plug already set up on the right side of the frame near a couple of relay mounts or what ever they are. You plug it in there. If not check out sandman's in the tech vault he tells you which wires you need to connect to which, its under adding after market lights.
Beautiful Black, T Bike pipes cross pipe blocked 18 tooth.
|
|
|
Re: Light Bar installation
|
Joined: Jan 2005
Posts: 11,126 Likes: 13
Should be Riding
|
|
Should be Riding
Joined: Jan 2005
Posts: 11,126 Likes: 13 |
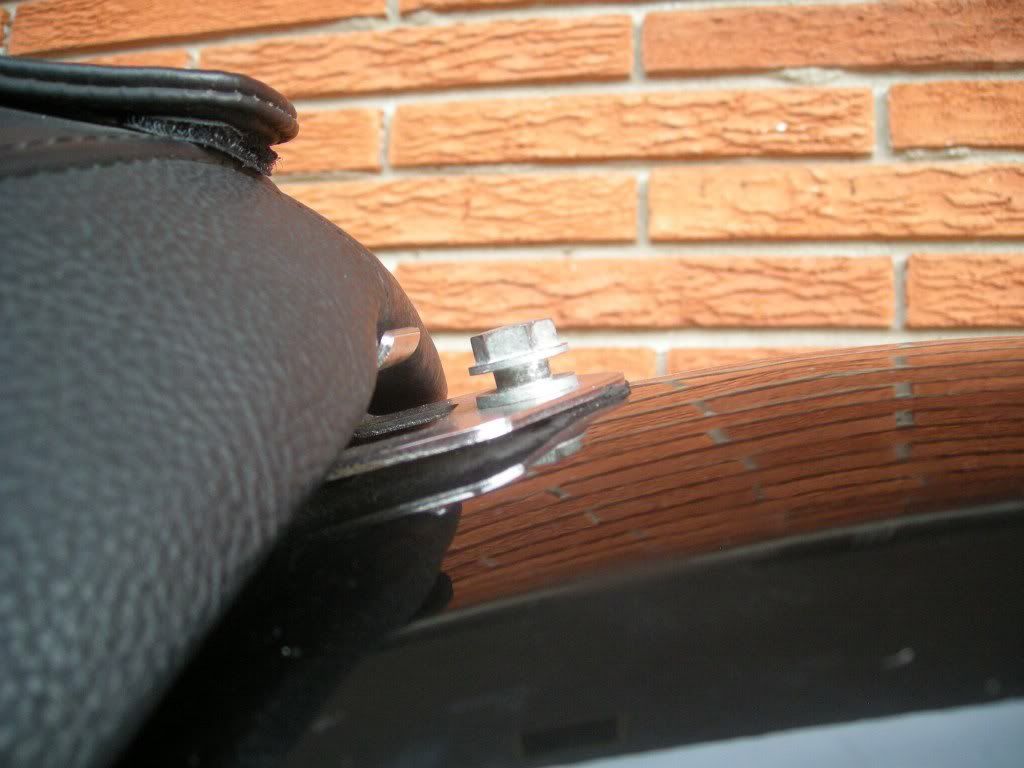
Last edited by moe; 07/16/2008 4:32 PM.
Blowing gravel off rural roads
|
|
|
Re: Light Bar installation
|
Joined: Jan 2005
Posts: 11,126 Likes: 13
Should be Riding
|
|
Should be Riding
Joined: Jan 2005
Posts: 11,126 Likes: 13 |
Here's an earlier thread from 2005 that discusses the Triumph Light bar
Blowing gravel off rural roads
|
|
|
Re: Light Bar installation
|
Joined: Jun 2008
Posts: 47
Greenhorn
|
|
OP
Greenhorn
Joined: Jun 2008
Posts: 47 |
Hey, thanks a lot y'all. Moe, I can definitely say that a picture is worth a thousand words - your photos will make it a helluva lot simpler for me!
-Dave
|
|
|
|
|