Re-assemble exterior parts to motor
Replace the right hand rotor cover using a new gasket and tighten the bolts. The cover will snap into place due to the strong magnet inside the rotor. Be sure you align it correctly with the gasket before final tightening.
Maybe a little late here, but putting the gasket back on when you originally remove the cam cover saves the time you spend waiting for it to cure. I did mention that earlier didn't I.
Apply some RTV to the cam cover so that the gasket will hold on while re-installing it. I used the high temperature red stuff (good for 650şF), I will scrape off the excess later with a razor blade. Just use a little bit, like shown here.
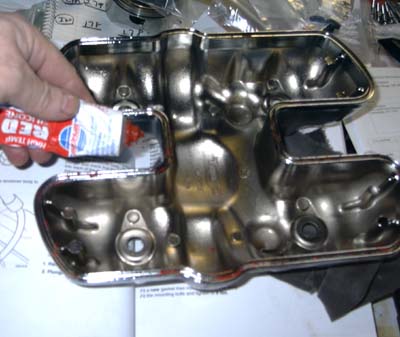
Stick the gasket back onto the cam cover with the groove going into the cover and the flat side up. Let it set up for an hour or two taking care that it stays put and does not slip out, especially around the innermost parts. If this is warm it will work easier.
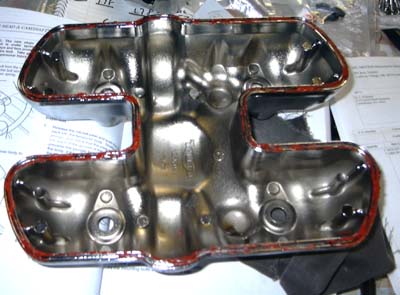
Re-install the cam cover and replace the four screws and the seals. When you put the seals back on, I used all new ones by the way, be sure the metal/copper/hard part is facing upward and will come into contact with the screws. This enables it to hold better. If they go on with the hard side down they might not seal good and cause an oil leak. Tighten the screws to 10Nm in a progressive criss cross pattern. DO NOT over-tighten them! They will snap/strip easily and then you will have to pull and tap the stripped cam cap before proceeding. The cam cover seems to slide in easier from the left side of the motor as well.
Again, I will scrape the excess red RTV off later.
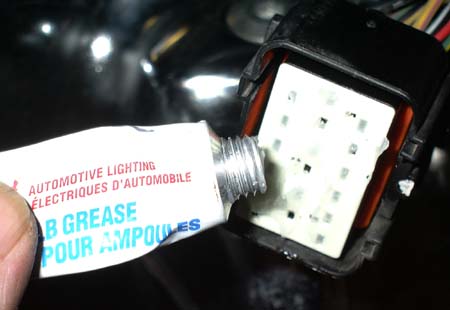
Now apply some dielectric grease to the electronics plug you pulled earlier, or if not, pull the big plug apart and apply some now. This stuff is great at preventing bad electrical contacts and helps prevent corrosion too. You should get in the habit of doing this to every electrical connection on the bike every time you expose one. It also helps prevent break downs in the rain due to electric getting wet. Prince of Darkness begone with thee!!
 Now is a good time to put new oil and new filter in the bike. Don't forget this part! I used Shell Rotella T standard petroleum 10-40w motor oil. DO NOT use synthetic until after another break-in period or the rings will not seal correctly and it will burn oil forever and burn the motor out very quickly.
Replace the triangular shaped part that holds the rear of the motor to the frame,Clean any carbon buildup off both ends of the headers and at the exhasut opening on the motor. If you have a lot use a small screwdriver but do not damage the face, it is al-u-minnie-um after all. A little brake fluid used very carefully will eat carbon away by the way. Just be careful not to spill it on anything. Maybe put a little on a rag then wipe, then wipe with some clean water to rinse away and left over fluids. Then you can re-fit the headers back into position. Use NEW gaskets at the header exhaust openings. There are little tabs on the exhaust gaskets (they are not regular donuts like in the old days) and these tabs will assist in holding the gasket in place while you slip the headers back on. I also put mine in with the slit side facing the motor. There was no mention in the manual about which way they should go, so I just did mine that way. Apply some of the brown copper anti-seize stuff to the threads on the exhaust bolts. Hand tighten them but leave them room to wiggle as we first need to install the rest of the header bits.
Now is a good time to put new oil and new filter in the bike. Don't forget this part! I used Shell Rotella T standard petroleum 10-40w motor oil. DO NOT use synthetic until after another break-in period or the rings will not seal correctly and it will burn oil forever and burn the motor out very quickly.
Replace the triangular shaped part that holds the rear of the motor to the frame,Clean any carbon buildup off both ends of the headers and at the exhasut opening on the motor. If you have a lot use a small screwdriver but do not damage the face, it is al-u-minnie-um after all. A little brake fluid used very carefully will eat carbon away by the way. Just be careful not to spill it on anything. Maybe put a little on a rag then wipe, then wipe with some clean water to rinse away and left over fluids. Then you can re-fit the headers back into position. Use NEW gaskets at the header exhaust openings. There are little tabs on the exhaust gaskets (they are not regular donuts like in the old days) and these tabs will assist in holding the gasket in place while you slip the headers back on. I also put mine in with the slit side facing the motor. There was no mention in the manual about which way they should go, so I just did mine that way. Apply some of the brown copper anti-seize stuff to the threads on the exhaust bolts. Hand tighten them but leave them room to wiggle as we first need to install the rest of the header bits.
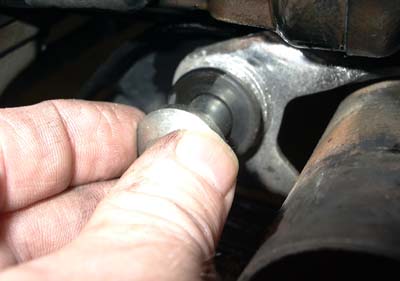
Be sure the crossover pipe under the bike is positioned correctly and inserted back into the other side. A clean up of the crossovers where they connect is also a good idea so it seals nicely. You can even apply a thin seal of the red RTV here to prevent leaks. Do not tighten the crossover bolts yet though! You need to first insert the two long bolts on the underside of the headers. Tighten these up first, they have rubber grommets and have play in them that you need for tightening the rest of the header system.
Now you can tighten the header bolts and then the crossover bolt shown here. Don't worry about the pipes just yet, I will put them on later, I just want to see if it runs first. Besides, you want the pipe sealant to set overnight anyway. Be sure to wipe the headers off with a good cleaner too, if you start it up with oil and slime on them it will burn and look like shit. Ask me how I know that. Takes some scrubbing to clean baked oil off the headers. It's better to take 10 minutes now to be sure they are nice and clean and so tight they will not move no matter how hard you yank on them. We don't want no leaks now do we?
 This is a good time to reward yourself and get off your hand and knees for a minute. Relax, we're almost there, don't rush the rest!.
 Next Page
Back to the main page